

Let me start with a confession: two years ago, if you’d asked me about self-hosting my business email, I’d have laughed and said, “Only spammers and mad scientists bother with that.” Fast-forward to today—I’m a convert, helping clients ditch mainstream email services and sidestep sky-high monthly fees. In this post, I’ll spill the messy truth, the learning curve, and why the “spam box curse” is mostly myth. Buckle up; real-world email rebellion is messier (and way more interesting) than you’ve been led to believe!
Confessions of an Email Rebel: Why Self-Hosting Isn’t Just for Spammers Anymore
I want to talk about your business email. Not marketing email, but the regular email you use on a day-to-day basis to send emails to your colleagues and correspond with your clients.
Debunking the Self-Hosted Email Stigma
For years, the idea of self-hosted email solutions has been shrouded in suspicion. If you ever mentioned running your own mail server, you were met with raised eyebrows or outright warnings: “That’s what spammers do!” or “Your emails will just end up in the spam folder.” The myth that self-hosted email is only for hackers, spammers, or tech hobbyists has been persistent and powerful.
But here’s the truth: Self-hosted email is not just for the fringe anymore. With the right setup and by following email deliverability best practices, you can achieve reliability and inbox placement that rivals—or even exceeds—mainstream business email hosting providers.
How Mainstream Providers Sold Us on ‘Protection’ and Convenience
Let’s be honest. We’ve all been conditioned to believe that paying $8 to $20 per user, per month for business email hosting is the only way to ensure our emails are safe, reliable, and professional. Big providers like Google Workspace and Microsoft 365 have done a masterful job of selling us on the idea that their walled gardens are the only places where “real” business email happens.
The promise is simple: pay a premium, and you’ll get peace of mind. Your data is “protected,” your emails are delivered, and you never have to think about the technical details. But what’s the real cost? Not just in dollars, but in terms of privacy and control.
Personal Journey: From Skeptic to Self-Hosting Enthusiast
I’ll admit it—I was a skeptic. The thought of managing my own mail server felt overwhelming. I believed the horror stories about endless spam folders and blacklists. But after years of spoon-feeding my business data into big algorithms (and paying for the privilege), I started to question the status quo.
Two years ago, I took the plunge. I transitioned my own business email, and then several clients, to affordable email hosting using self-hosted solutions. Was it easy? Not at first. There was a learning curve, and a few bumps along the way. But the results surprised me: not only did our emails land in inboxes, but we also gained a level of control and transparency that mainstream providers simply can’t offer.
Eye-Openers: Data Privacy and What’s Really at Stake
Here’s what really opened my eyes: every email you send and receive through a mainstream provider is another data point for their algorithms. Your business communications become part of a vast marketing machine, used to profile you and your clients. With self-hosted email solutions, you decide where your data lives and who can access it.
Self-hosting isn’t just about saving money (though that’s a big plus). It’s about reclaiming your privacy and taking responsibility for your own digital footprint. For businesses that value confidentiality—law firms, consultants, creative agencies—this can be a game-changer.
The Unexpected Satisfaction of Sidestepping the Marketing Machine
There’s something deeply satisfying about knowing your business email isn’t being mined for advertising or upsells. When you run your own mail server, you’re not just a customer—you’re in control. You set your own rules, manage your own backups, and decide how your data is handled.
And the best part? The myth that self-hosted email always gets flagged as spam is just that—a myth. By following email deliverability best practices (proper DNS records, SPF/DKIM/DMARC, and secure server configuration), I’ve seen deliverability rates that match or beat the big providers. Real-world experience proves that self-hosted email is not relegated to the spam folder by default.
Like DIY Home Repair: Harder at First, But Oh-So-Rewarding
Transitioning to self-hosted email felt a lot like my first attempt at DIY home repair. At first, it was intimidating. There were moments of frustration, and I made a few rookie mistakes. But with each step, I gained confidence—and the payoff was worth it.
Now, after two years and multiple client migrations, I can say with confidence: self-hosted email is a viable, affordable, and empowering choice for business email hosting. It’s not just for techies or rebels. It’s for anyone who wants more control, better privacy, and a break from the endless cycle of subscription fees.
Comparing the Costs: Mainstream vs. Self-Hosted Email
To put things in perspective, here’s a quick look at the typical pricing for mainstream providers versus average self-hosted monthly costs:
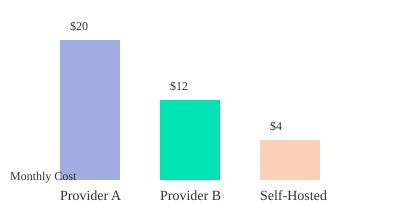
As you can see, affordable email hosting isn’t just a dream—it’s a reality with self-hosted solutions. And with the right approach, you don’t have to sacrifice reliability or deliverability to get there.
Choosing Your Tools: Servers, Domains, and Software (Without the Geek Speak)
Let’s get real: self-hosting your business email doesn’t have to be a tech nightmare. But you do need the right tools—servers, domains, DNS, and a software stack. Here’s your crash course, minus the jargon, with real-life vendor picks and hard-won lessons from the trenches. If you’re looking for the best self-hosted email server setup, this is where you start.
Domains: Your Email’s Home Address
Every email address needs a domain name. Think of it as your business’s digital street address. Without it, your email simply doesn’t exist. For this, I recommend Porkbun—and not just because they’re a sponsor. They’re consistently ranked as a top domain registrar by USA Today and Forbes, and right now, Porkbun has a special low price of less than six bucks for the first year of your next .app or .dev domain name. That’s a steal, especially if you’re a developer, designer, or just want a modern, secure domain for your project.
- .app and .dev domains are powered by Google Registry, with built-in security (HSTS preload list).
- Porkbun throws in freebies: SSL certificates, WHOIS privacy, URL forwarding, and hosting trials.
- Support is from real humans, 365 days a year.
Pro tip: These domains are perfect for separating your main site, blog, docs, and apps. And at under $6/year, you can afford to experiment.
Servers: Where Your Email Lives
Now, you need a place for your email server to live. Enter Hetzner. Why Hetzner? Because they’re one of the few server providers that allow you to use Port 25—the magic port required for sending outgoing email (SMTP). Many providers block this by default, which can leave your emails stuck in limbo. Trust me, I learned this the hard way: I once spent days troubleshooting why my emails wouldn’t send, only to discover my provider had Port 25 locked down. Don’t repeat my mistake.
- Shared CPU servers start at just €4.49/month—plenty for small teams.
- Dedicated CPU plans (recommended if you’ll run other apps) start at about €13/month for 2 vCPU and 8GB RAM.
- Hetzner may take a few months to fully trust new accounts before opening Port 25, so plan ahead.
Specs? For the Cloudron stack (more on that below), you’ll need at least 2GB RAM and 20GB storage. Nearly any Hetzner plan fits the bill. If you want to run your website or other tools on the same server, just size up. You can always scale later.
DNS: The Unsung Hero (and How to Manage It)
DNS record management is the glue that connects your domain to your server. It tells the internet where to find your email and website. I use Cloudflare for DNS—think of it as digital insurance. It offers:
- Easy DNS record management (no command line needed)
- API connections for automation (if you want to get fancy later)
- Extra security, caching, and DDoS protection
Don’t fall for “free DNS automation” tools unless you know exactly what they’re doing. Sometimes, manual control is safer—especially when you’re learning.
Software Stack: The Brains Behind Your Email
Here’s where many people get overwhelmed. But with the right email server platforms, it’s easier than you think. I use Cloudron—a utility-grade, user-friendly platform that bundles everything you need. The free plan covers basic needs, and you can upgrade if you want more features later.
- Dovecot (IMAP server): Handles fetching and storing your email. Works with any mail app—no headaches.
- Haraka (SMTP server): Sends your outgoing mail. Reliable and easy to set up in Cloudron.
Here’s my confession: I used to get lost in the alphabet soup of IMAP, SMTP, and DNS. I nearly gave up when my emails wouldn’t send or arrive. But Cloudron’s interface makes it simple—no command line required after the initial setup. If you’re looking for open-source email servers, know that Cloudron uses rock-solid open-source components under the hood.
Why I Avoid All-in-One Providers (and Rookie Mistakes to Dodge)
- Many “all-in-one” hosts block key ports or limit your control. That means emails get stuck, or you can’t tweak settings when needed.
- Free trials can be tempting, but check the fine print: Are you locked out of important features? Is support responsive?
- Server reputation matters. Cheap, fly-by-night hosts often have blacklisted IPs—your emails will go straight to spam.
Server OS: Don’t Overthink It
Cloudron currently recommends Ubuntu 24.04. Always check their site for the latest supported version before you start. Installing on the wrong OS is a classic rookie mistake (ask me how I know!).
SVG Chart: Provider Comparison Table
Setup Surprises: Sizing, Security, and Backup Strategies They Don’t Teach in Tech Class
Email Server Configuration: Sizing Up Without Overkill
When you’re diving into affordable email hosting for your business, it’s tempting to think bigger is always better. But here’s the real deal: unless you’re planning to run multiple heavy-duty services on your server, you don’t need to max out your specs. For a small business email server deployment, Cloudron (our recommended platform) only needs 2GB of RAM and 20GB of storage. That’s it. Most entry-level servers—even Hetzner’s budget-friendly options—will do the job just fine.
If you’re only hosting a handful of email addresses, don’t waste money on a monster machine. However, if you’re stacking services—like running your website, a Nextcloud instance, or other self-hosted tools—consider a plan with more RAM and CPU. The beauty of cloud providers like Hetzner is scalability: you can always upgrade later as your needs grow, so there’s no need to overcommit from the start.
Operating System Choices: The Hidden Key to Smooth Email Server Deployment
One of the most overlooked steps in email server configuration is picking the right operating system version. Cloudron, for instance, is picky about which OS versions it supports. At the time of writing, Ubuntu 24.04 is the go-to, but this can change. Always double-check Cloudron’s install page for the latest supported OS before spinning up your server. Choosing the wrong version can mean wasted hours or even a full reinstall.
Provider Trust Periods: The Port 25 Plot Twist
Here’s a surprise they don’t mention in tech class: your server provider doesn’t trust you right away. If you’re using Hetzner, you’ll run into a trust period before you get full email sending capabilities. Specifically, Port 25—the port used for outbound email (SMTP)—is locked down for new accounts. As Hetzner puts it:
If you want to open up Port 25, you’ll actually have to have a server that’s being paid for for a couple of months before they trust you enough to open up that port.
This is their way of fighting spam, but it means you can’t send business email from your new server until you’ve built up a payment history. Plan for this delay in your email server deployment timeline, especially if you’re migrating away from a third-party provider. Trust timelines vary by host, but with Hetzner, expect a wait of several months before full SMTP access.
| Provider | Port 25 Trust Period | Backup Cost Impact |
|---|---|---|
| Hetzner | Typically a few months payment history required | Cloudron backups add ~20% to server cost |
SSH Keys: Handling Security Like a Mortal
SSH keys are the gold standard for secure server access, but don’t let them intimidate you. If you’re not comfortable generating and using SSH keys, Hetzner will simply email you the root password. It’s not as secure, but it gets you started. Make a note to learn SSH basics soon—it’s a skill that pays off in the long run. But for your first email server configuration, don’t let SSH be a blocker. You can always switch to keys later.
Firewall and Port Pitfalls: The One Port That Almost Ruined My Week
Firewalls are your first line of defense, but they’re also a common source of headaches. Forgetting to open a single port can break your email server deployment. Cloudron needs specific ports open to function—SMTP, IMAP, web admin, and more. If you skip this step, you might find yourself locked out or unable to send/receive mail. Always check Cloudron’s documentation for the current list of required ports. You can set up the firewall during deployment or circle back later, but don’t forget it entirely. Trust me, troubleshooting a blocked port at 2AM is not fun.
Backup Mania: Why More Is Always Better
Backups are the unsung heroes of affordable email hosting. I enable both server-level backups (via Hetzner) and app-level backups (via Cloudron). Why both? Because layered security is the best security. Server-level backups capture everything—OS, configs, data—while Cloudron’s backups focus on your apps and their data. If something goes wrong, you have multiple recovery points.
Enabling Hetzner’s server backups adds about 20% to your monthly cost, but it’s worth every cent. If you’re on a tight budget, you can rely solely on Cloudron’s built-in backups, but I’m firmly in the “more backups is always better” camp. You’ll thank yourself in six months when a rogue update or accidental deletion strikes.
When to Splurge, When to Save: Server Costs, Trust Periods, and Hidden Gotchas
Starting out, you can get a solid server for under €5/month, but costs rise as you add features. Dedicated CPUs, extra RAM, and especially backups will bump up your bill. The good news? You can start small and scale as your business grows. Just remember to factor in the trust period for Port 25—if you need to send business email right away, this delay is a real gotcha. Plan your migration with these timelines in mind to avoid downtime or awkward “email not delivered” moments.
In summary, smart sizing, layered backups, and a little patience with provider trust periods are the keys to a smooth, scalable email server deployment. Don’t let the setup surprises catch you off guard—embrace them, and you’ll be running your own affordable email hosting like a pro.
DNS, API Connections, & The Dance of Deliverability: It’s Not as Scary as It Sounds
If you’re self-hosting your business email, DNS record management is the unsung hero (or villain) of your entire setup. Think of DNS as the address book for the post office—if you get the address wrong, your mail simply won’t arrive. That’s why understanding DNS records like MX, SPF, DKIM, and DMARC is essential for reliable email server configuration and top-notch email deliverability best practices. Let’s break down how to tame this beast, automate the boring bits, and avoid common pitfalls.
DNS Records: Your Best Friends (Until You Ignore Them)
When it comes to email, four DNS records matter most:
- MX (Mail Exchange): Tells the world which server handles your domain’s email.
- SPF (Sender Policy Framework): Lists which servers are allowed to send email for your domain, helping to block spoofers.
- DKIM (DomainKeys Identified Mail): Adds a digital signature to your emails so recipients know they’re legit.
- DMARC (Domain-based Message Authentication, Reporting & Conformance): Tells other mail servers what to do if SPF or DKIM checks fail—quarantine, reject, or just report.
Skip these, and your emails are likely to end up in the spam folder (or never arrive at all). Set them up right, and you’ll enjoy smooth, reliable delivery.
Automating DNS with Cloudflare API: Less Can Go Wrong Than You Think
Manually entering DNS records is possible, but it’s tedious and error-prone. Automated DNS management with Cloudflare’s API streamlines the process, reduces mistakes, and makes ongoing changes a breeze. Here’s how it works:
- Connect your domain registrar (like Porkbun) to Cloudflare.
- Use Cloudflare’s free plan—it’s more than enough for most self-hosted email setups.
- Create an API token in Cloudflare with the right permissions (see table below).
- Let your email server software (like Cloudron) manage DNS records automatically via the API.
This approach means you don’t have to copy-paste cryptic DNS records every time you add a new service or tweak your setup. And if you’re running a website or other apps, Cloudflare’s caching and security features are a bonus:
But if you might be running a website or any other applications that would benefit from caching, well, then definitely connect it up to Cloudflare.
Cloudflare vs. Porkbun for DNS: Why Separation Reduces Headaches
Even if you bought your domain through Porkbun (or another registrar), it’s smart to manage DNS separately on Cloudflare. This separation gives you:
- Better control: You can take advantage of Cloudflare’s advanced DNS features and caching.
- More flexibility: If you ever switch registrars, your DNS stays put.
- Enhanced security: Cloudflare’s DDoS protection and API access are top-notch.
Cloudflare does sell domains, but keeping registration and DNS management separate is a best practice for most setups.
API Permissions: What’s Safe to Grant?
When creating your Cloudflare API token, you’ll see a lot of permission options. For automated DNS record management, you only need:
- Zone (Read): Lets your server see your DNS records.
- Zone DNS (Edit): Allows your server to add or update DNS records.
Limit the token to only the specific domain you’re working with for extra safety. It may feel scary to let a tool edit your DNS, but platforms like Cloudron have built-in safeguards to prevent accidental overwrites. If you’re still nervous, you can start with manual DNS entry—but trust me, automation is worth it.
Manual DNS Entry: Why It’s Rarely Worth the Sweat
You can manage DNS records manually at your provider, but it’s easy to make mistakes—one typo, and your email stops working. Plus, every time you add a new app or service, you’ll need to update records by hand. Automated DNS management is faster, safer, and less stressful.
DNS Propagation: The Waiting Game
Once you update your DNS records, you’ll need to wait for the changes to spread across the internet. This is called DNS propagation, and it can take anywhere from a few minutes to about an hour, depending on your domain’s TLD. During this time, you might find yourself compulsively refreshing your browser to see if the changes have taken effect. Patience is key!
| Cloudflare Plan Used | API Permission Types | DNS Propagation Time |
|---|---|---|
| Free | Zone (read/edit) | Several minutes to 1 hour (varies by TLD) |
Putting It All Together: The Deliverability Dance
Proper DNS record management, automated with Cloudflare’s API, is the foundation of reliable email server configuration. Don’t skip SPF, DKIM, and DMARC—these are your ticket to the inbox, not the spam folder. And remember: DNS is like the address book for the post office—wrong address, no mail delivery. Take the time to set it up right, and you’ll reclaim control over your business email with confidence.
Beyond the Command Line: GUI, User Experience, and the Reality of Modern Email Hosting
Transitioning from the Terminal to Graphical Interface: The Sigh of Relief Moment
If you’ve ever stared at a blinking terminal cursor, wondering if you typed the right command or missed a crucial flag, you know the anxiety that comes with configuring self-hosted email solutions the old-fashioned way. The good news? Modern email server platforms like Cloudron have changed the game. Once your server is spun up, you’re greeted not by a wall of cryptic text, but by a clean, approachable web interface. This is the moment you breathe out—a sigh of relief that signals you’re not alone in the trenches.
The transition from command-line to graphical user interface (GUI) is more than just cosmetic. It’s about making complex tasks—like email client configuration and user management features—accessible to almost anyone with a bit of technical curiosity. As one guide puts it:
Now, this is going to be our first lesson about configuring email inside of Cloudron.
You’re not just learning commands; you’re learning a workflow that makes sense visually and logically.
Cloudron’s Web GUI: Managing Users, Adding Domains, and Configuring Aliases Without Sweating
Once you log into Cloudron’s dashboard (which, yes, sometimes takes a minute—“just be patient, hang tight”), you’ll find that most of the heavy lifting is handled through simple forms and buttons. Want to add a new user? Click, type, save. Need to set up a new domain or add an email alias for your sales team? It’s all there in the GUI, no advanced coding required.
Here’s what you can expect to manage through Cloudron’s interface:
- User accounts: Create, edit, or remove users with a few clicks.
- Mailbox management: Assign mailboxes to users, set up forwarding, and manage quotas visually.
- Email aliases: Route messages to the right people without touching a config file.
- Domain management: Add and verify domains, all from the same dashboard.
This GUI-driven approach bridges the gap between technical and non-technical users, making self-hosted email solutions a realistic option for small teams and businesses.
Multiple DNS Providers Supported: Flexibility for Future-Proofing Your Email Setup
One of the biggest headaches in email hosting is DNS configuration. Cloudron’s web GUI takes the sting out by supporting a wide range of DNS providers, including Porkbun, Cloudflare, and many more. This means you’re not locked into a single provider—if your business needs change or you want to experiment, you have options.
Supported DNS providers within Cloudron include:
- Porkbun
- Cloudflare
- Route53
- DigitalOcean
- And several others
This flexibility is key for future-proofing your email setup. If you ever need to migrate or expand, you’re not starting from scratch.
Why a Seemingly Scary "Your Connection is Not Private" Screen is Just a Rite of Passage
The first time you log into your new server, you might see a browser warning: Your connection is not private. Don’t panic! This is a normal part of the process when your server’s SSL certificate hasn’t been issued yet. It’s not a sign you’ve made a mistake—it’s a rite of passage for anyone setting up self-hosted email solutions.
Click through the warning, and you’ll soon be able to secure your server with a valid certificate. This small hurdle is worth it for the control and transparency you gain.
The Weird Joy of Naming Your Server: A Very Human Ritual
There’s a unique satisfaction in naming your server. Whether you go with something playful (mailinator), professional (mail.yourcompany.com), or personal, this step makes the process feel real. It’s your stake in the ground—a reminder that this is your infrastructure, not someone else’s.
Pick memorable server and domain names. It’ll make management easier and give your team a sense of ownership.
A Look at User and Mailbox Management Features You Won’t Want to Live Without
Modern email server platforms like Cloudron offer user management features that rival (and sometimes surpass) big-name providers:
- Bulk user creation: Onboard your whole team in minutes.
- Role-based access: Control who can manage settings, access mailboxes, or administer domains.
- Alias and group management: Route emails to teams, departments, or external addresses with a few clicks.
- Easy password resets and security controls: No more waiting on a support ticket.
All of this is handled through the GUI, making it easy to delegate tasks or train new admins. And with setup completion time after server spin-up typically less than 30 minutes (excluding DNS propagation), you’ll be up and running before you know it—even if it feels like it’s “taking forever.”
The reality is, with the right tools, self-hosted email is no longer just for sysadmins and command-line wizards. The GUI experience puts powerful email client configuration and user management features within reach for anyone ready to reclaim control.
Caveats and Misadventures: What Goes Wrong (and How to Laugh About It Later)
Let’s be honest: self-hosting your business email isn’t a flawless journey. As much as guides and best practices promise smooth sailing, you’re going to hit a few bumps—and maybe even a pothole or two. But here’s the good news: most deliverability problems are fixable with the right detective work, a bit of patience, and a willingness to laugh at yourself. As I’ve learned firsthand, “It hasn’t been a straight line of success though, there’s been ups and downs along the way.” Let’s walk through some of the most common misadventures, what they can teach you, and how to keep your sense of humor (and your sanity) intact.
Painful but Useful: When DNS Records or Server Settings Break
Picture this: you’ve triple-checked your setup, hit “send” on your first self-hosted email, and… nothing. Or worse, it bounces back with a cryptic error. Nine times out of ten, the culprit is a missing or misconfigured DNS record—SPF, DKIM, or DMARC. These records are the backbone of email deliverability best practices, telling the world (and spam filters) that your messages are legitimate.
When things break, it’s easy to panic. But the world doesn’t end. You might sweat a little, but with tools like dig or online DNS checkers, you can usually spot what’s wrong. Fixing a typo in your SPF record or updating a DKIM key can feel like defusing a bomb, but when you finally see your emails land in the inbox, it’s pure relief. Remember: every misstep is a lesson, and you’ll get faster at troubleshooting with each one.
An Epic Fail: The Time My Server IP Got Blocklisted
Nothing prepares you for the moment you realize your server’s IP address is on an email block list. One day, everything’s fine. The next, your emails are bouncing from major providers, and you’re frantically searching “why is my email blocked?”
Blocklists are a rite of passage for self-hosters. Sometimes, it’s because your IP is new and inherits a bad reputation from a previous user. Other times, a misconfigured server accidentally sends out messages that look spammy. The fix? First, check your status on sites like MXToolbox. If you’re listed, follow the removal process—most blocklists will delist you if you explain and demonstrate that you’ve fixed the problem. Going forward, keep your server secure, monitor outgoing mail, and use spam filtering solutions to catch anything suspicious before it leaves your system.
Navigating Port 25, Outgoing SMTP Restrictions, and Building Trust
One of the most surprising hurdles is sending mail out of your server in the first place. Many hosting providers block Port 25—the default for outgoing SMTP—by default. Why? Because they don’t want new users signing up and blasting out spam. If you want to open up Port 25, you’ll actually have to have a server that’s being paid for a couple of months before they trust you enough to open up that port. It’s a waiting game, but it’s also a sign that your provider takes reputation seriously. In the meantime, you can often use their SMTP relay or a third-party service until you’ve built up enough trust.
Spam Folder Paranoia: Beating the Odds with Deliverability Best Practices
Even after you’ve nailed your DNS records and SMTP setup, there’s the constant worry: will my emails end up in the spam folder? The answer depends on your sender reputation, the content of your messages, and those all-important authentication records. Stick to email deliverability best practices: keep your lists clean, avoid spammy language, and monitor your sender score. Tools like Mail-Tester and Postmark’s spam check can help you spot issues before you hit send. Over time, as your domain and IP build a positive reputation, you’ll see more messages land where they belong.
How Backup Strategies Saved My Bacon—Twice
Here’s a hard-won lesson: always have backups. Once, a botched server update wiped out my mail queue. Another time, a misconfigured filter deleted a week’s worth of incoming messages. Both times, my backup strategy saved me. Regular snapshots and offsite backups mean you can recover quickly from even the worst mistakes. It’s not just about peace of mind—it’s about business continuity.
Pro Tips for Monitoring, Troubleshooting, and Forgiving Yourself
Self-hosted email success is a mix of preparation and resilience. Monitor your logs, set up alerts for failed deliveries, and check your server’s health regularly. When things go wrong—and they will—treat it as a puzzle, not a disaster. Most issues, from blocklists to DNS hiccups, can be fixed with a little research and patience. And above all, forgive yourself for rookie mistakes. Every misadventure is a step toward mastery.
In the end, reclaiming control of your business email is as much about learning from setbacks as it is about celebrating successes. With the right mindset, a few good tools, and a willingness to laugh at the occasional disaster, you’ll not only survive—you’ll thrive. So, here’s to the ups, the downs, and the stories you’ll tell later. Happy self-hosting!
TL;DR: Self-hosting your business email isn’t just for rebels or coders—it’s cost-effective, surprisingly doable, and puts you in the driver’s seat—so long as you dodge some potholes. Skip the overpriced subscriptions and explore the how, why, and what-no-one-tells-you of real-world self-hosted email.
Post a Comment